Blogger templates

This is default featured post 1 title

Go to Blogger edit html and find these sentences.Now replace these sentences with your own descriptions.This theme is Bloggerized by Lasantha Bandara - Premiumbloggertemplates.com.

This is default featured post 2 title

Go to Blogger edit html and find these sentences.Now replace these sentences with your own descriptions.This theme is Bloggerized by Lasantha Bandara - Premiumbloggertemplates.com.

This is default featured post 3 title

Go to Blogger edit html and find these sentences.Now replace these sentences with your own descriptions.This theme is Bloggerized by Lasantha Bandara - Premiumbloggertemplates.com.

This is default featured post 4 title

Go to Blogger edit html and find these sentences.Now replace these sentences with your own descriptions.This theme is Bloggerized by Lasantha Bandara - Premiumbloggertemplates.com.

This is default featured post 5 title

Go to Blogger edit html and find these sentences.Now replace these sentences with your own descriptions.This theme is Bloggerized by Lasantha Bandara - Premiumbloggertemplates.com.

Minggu, 31 Juli 2011

<iframe name="menampilkan blog/web dalam postingan" src="http://www.pkpu.or.id/imsyak/" frameborder="0" marginwidth="0" marginheight="0" scrolling="yes" width="500" height="1000"></iframe><a href="http://www.ilmu-reparasi-komputer1.co.cc/">blog</a>

Sabtu, 30 April 2011

AveDesktopSites: An Alternative for Missing Active Desktop Feature in Windows Vista

AveDesktopSites is a small replacement for the Active Desktop utility that is no longer present in Windows Vista. Basically, the application shows websites on the desktop, but, unlike Active Desktop, they can not be interacted with. Download Ave Desktop Sites
This is useful for showing website data, such as news or weather images on your desktop.
Download Link
Homepage

How to Remove Nokia PC Suite Folder, Web Folders, My Sharing Folders or Other Unwanted Items from My Computer?

Whenever you open My Computer in Windows, you see a few extra items like Web Folders, My Sharing Folders, Nokia PC Suite folder, etc. Actually they are installed by some software like Nokia PC Suite, Windows Live Messenger, Microsoft Forntpage, etc.
Sometimes we want to remove them to make the My Computer window clean but we can't find any way to remove them.
So here I'll tell you a very simple way to remove them easily and permanently:
1. Open regedit and goto:
HKEY_LOCAL_MACHINE\SOFTWARE\Microsoft\Windows\Current Version\explorer\MyComputer\NameSpace
2. Under this key, you'll see a few keys having name in following format:
{xxxxxxxx-xxxx-xxxx-xxxx-xxxxxxxxxxxx}

3. These keys represents those My Computer items. If you select any key, you can see its description in right-side pane.
4. So delete your desired key and it'll remove the unwanted item from My Computer window.
5. Following are the keys for My Sharing Folders and Web Folders:
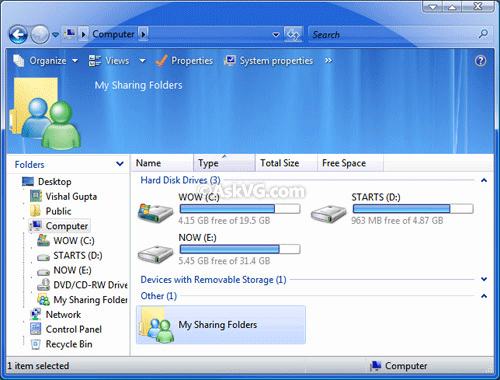
My Sharing Folders - {FC9FB64A-1EB2-4CCF-AF5E-1A497A9B5C2D}
Web Folders - {BDEADF00-C265-11D0-BCED-00A0C90AB50F}
Printers & Faxes - {2227A280-3AEA-1069-A2DE-08002B30309D}
Network Connections - {7007ACC7-3202-11D1-AAD2-00805FC1270E}
Administrative Tools - {D20EA4E1-3957-11D2-A40B-0C5020524153}
Fonts - {D20EA4E1-3957-11D2-A40B-0C5020524152}
Scheduled Tasks - {D6277990-4C6A-11CF-8D87-00AA0060F5BF}
Recycle Bin - {645FF040-5081-101B-9F08-00AA002F954E}
BONUS TIP: You can use the same method to add your desired items in My Computer window. Just goto the registry key mentioned in point 1 and add a new key having name mentioned in point 5.

How to Add Missing Search in Folders Context Menu in Windows Vista with SP1?

If you are a Windows Vista user and installed SP1 recently, then you might have noticed missing "Search" option in folders context menu (the menu which appear when you right-click). Windows Vista SP1 removes the "Search" option from folders context menu. It sounds strange but there is a way to get the option back. So here is a small tutorial to get the missing Search option back:
1. Open regedit and goto:
HKEY_CLASSES_ROOT\Directory\shell\find
2. In right-side pane, delete String value "LegacyDisable".

3. Thats it. The "Search" option will be back in folders context menu:

Get Approx. 1 GB Free Space by Removing Unnecessary Files After Installing SP1 in Windows Vista

When you install SP1 in Windows Vista, it creates a backup of system files in case you want to uninstall the SP1 in future. It takes approx. 1 GB space, so if you are running out of space and want to free up some space on your hard disk, then you can follow this tutorial to get the free space. 1. Click on “Start button -> All Programs -> Accessories“. Right-click on “Command Prompt” and select “Run As Administrator“. If you are prompted to enter password, enter the password and continue. You can also open Command Prompt in Administrator mode by typing “cmd” in Startmenu Search box and press “Ctrl+Shift+Enter“.
2. Now provide following command:
vsp1cln.exe
3. It'll ask for confirmation, type Y and wait for a few minutes.
4. You'll get approx. 1 GB free space when the command ends executing.
NOTE: Use this command, if you don't want to uninstall SP1 in future cause after using this command you'll no longer be able to uninstall SP1.

Pitaschio: A Free Utility to Customize Windows and Desktop Experience

itaschio (yes, its the correct name not a spelling mistake) is a great, must have and absolutely free application for Microsoft Windows OS. It lets you customize how your icons appear on Desktop, how your opened Windows behave? You can customize lots of handy features which are not available in Windows settings by default.
Following are a few interesting things which can be done using this small nifty utility:
  • You can set Small Icons view on Desktop
  • You can disable Minimize, Maximize, Close button in Windows titlebar
  • You can disable Windows, CAPs Lock, ALT, Insert, Function keys
  • You can change Desktop icons text color
  • You can control volume using your mouse wheel
  • You can use virtual desktops
  • You can set Windows to stay within the visible display screen
  • You can set various mouse shortcuts
  • You can go to the parent folder by double-clicking anywhere in the child folder
  • You can set Windows transparency using mouse wheel
There are many other useful tweaks inside this small application. It supports both Windows XP as well as Windows Vista.
It doesnt need to install. Just download the ZIP file, extract it and run the application directly.
Download Link
Homepage

How to Hide / Show Specific Control Panel Applets / Icons in Windows?

This tutorial will guide you to hide or show any specific Control Panel applet in Windows. This tutorial will work for all Windows versions: NT, 95, 98, Me, 2000, XP, Server 2003, Vista, Server 2008 and 7.
METHOD A: For All Windows Versions except Windows 95, 98 & Me
1. Open regedit and goto:
HKEY_CURRENT_USER\Control Panel\
OR
HKEY_LOCAL_MACHINE\SOFTWARE\Microsoft\Windows\CurrentVersion\Control Panel\
2. Under this key create a new key with the name don't load , so the new path will be:
HKEY_CURRENT_USER\Control Panel\don't load
OR
HKEY_LOCAL_MACHINE\SOFTWARE\Microsoft\Windows\CurrentVersion\Control Panel\don't load
3. Now in right-side pane, create new String value. Set its name to the file name of the applet which you want to hide, e.g. if you want to hide Display applet then set its name to Desk.cpl now set its value to no to hide it. If you want to show it again, either set its value to yes or simply delete the String value.
To use the above mentioned method, you'll need to know the .CPL file name of the desired applet. You can search for .CPL in Windows Search or you can use help of following list which contains .cpl file names of almost all default Control Panel applets:

METHOD B: For All Windows Versions except Windows 95, 98 & Me
1. Open regedit and goto:
HKEY_CURRENT_USER\Software\Microsoft\Windows\CurrentVersion\Policies
2. Look for a key "Explorer" under it. If its not present, then create a new one and give it name Explorer.
3. Select "Explorer" key and in right-side pane, create a new DWORD value DisallowCpl and set its value to 1
4. Now create another new key under Explorer key with the name DisallowCpl so the new path will be:
HKEY_CURRENT_USER\Software\Microsoft\Windows\CurrentVersion\Policies\ Explorer\DisallowCpl
5. Select "DisallowCpl" key and in right-side, create new String value with name 1 and set its value to the applet name which you want to hide.You don't need to use the .cpl file name of applet in this method. You have to put the applet label which you see in Control Panel.

e.g., If you want to hide AutoPlay applet, then create a new String value, give it name 1 and set its value to AutoPlay. If you want to hide more applets, then simply create more String values with names 2, 3 and so on and set their values to the applet label.
METHOD C: For All Windows Versions except Windows 95, 98 & Me
This method is opposite of METHOD B. In this method, you'll tell Windows which applets should be visible and Windows will automatically hide the rest.
Its useful when you want to show a few specific applets and want to hide remaining applets. So you just need to create a few String values to tell Windows which applets you want to show. It'll save your valuable time.
1. Open regedit and goto:
HKEY_CURRENT_USER\Software\Microsoft\Windows\CurrentVersion\Policies
2. Look for a key "Explorer" under it. If its not present, then create a new one and give it name Explorer.
3. Select "Explorer" key and in right-side pane, create a new DWORD value RestrictCpl and set its value to 1
4. Now create another new key under Explorer key with the name RestrictCpl so the new path will be:
HKEY_CURRENT_USER\Software\Microsoft\Windows\CurrentVersion\Policies\ Explorer\RestrictCpl
5. Select "RestrictCpl" key and in right-side, create new String value with name 1 and set its value to the applet name which you want to show.You don't need to use the .cpl file name of applet in this method. You have to put the applet label which you see in Control Panel.

e.g., If you want to show AutoPlay applet, then create a new String value, give it name 1 and set its value to AutoPlay. If you want to show more applets, then simply create more String values with names 2, 3 and so on and set their values to the applet label.
Now Windows will only show the applets which you mentioned in String values, other applets will be hidden.
METHOD D: For Windows 95, 98 & Me
1. Open "%windir%\Control.INI" file. Where "%windir%" denotes Windows folder which is present in system drive where Windows is installed.
2. You'll see a line saying [don't load] in the file. If you can't find it, then create a new line at last.
3. Now under this line, you can set .CPL file name of your desired applet which you want to hide in following format:
filename.cpl=no
e.g.,
If you want to hide Display applet, then the syntax will be:
desk.cpl=no
You can create similar lines for other applets which you want to hide. The .CPL file name can be obtained from the list mentioned in METHOD A.
METHOD E: Using TweakUI Power Toy
You can also use Microsoft official powertoy "TweakUI" to easily hide/show control panel applets.
Download TweakUI from here. Run it and click on "Control Panel" in left side section. Now in right-side list, you can easily hide/show desired applets by just enabling/disabling the appropriate applet checkbox.

Click on Apply button and you have done.
NOTE: This tutorial can also be used in case some applets in Control Panel have been disabled accidentally and you want to enable them again. Just follow the steps mentioned in above methods and delete the required string value or line.

Share

Twitter Delicious Facebook Digg Stumbleupon Favorites More